
How to sew a linen shirt and shorts - Sew SALTWATER!
- Leah Widdicombe
- Aug 7, 2024
- 6 min read

Dreaming of having an easy fun outfit that you can wear to the beach, on hikes, or to sleep in? You're going to want to tune into this new sewing pattern!
Say no more, take me straight to the gold 👉 get the SALTWATER pattern here!
This is a 2-piece set for those who want to make modern linen clothes built for life's fun adventures! |
There are SO many ways to make it! 👇
I had about a dozen people try out the sewing pattern before it was published, and they all came to the assignment with fun variations to make the garment unique to their needs. Check out what they made, what they changed, and what they plan to do next time... you might find some ideas worth stealing!
Katie

Top: View A
Shorts: View D
My favorite part of this pattern:
These are easy, roomy shorts to wear to the beach, to the park, or to sleep in! I like the options of the leg hem finishes because they're a huge style change between them without much effort.
The shirt style is so casual, chic, and relaxed! Boatnecks will always be a class act.
What I would do differently next time: I would prefer to use 1" elastic, so I'd adjust my waistband details for that. I really like the finishes of the bottom hems, so no changes there!
Alyson


Top: View A
Shorts: View B
What I changed:
I made my top out of a very light recycled silk sarong fabric I got recently at a fiber fair. I'm trying not to keep fabric long enough that it enters into the "precious" category because then I'm afraid to cut it, LOL!... Because I made mine with silk, I experimented with different seams. I did some french seams, used my rolled hem on my serger, and opted to use the selvage edge on my ruffle because it's a border print. I did make my ruffle wider because I thought it would hang better.
Overall, I love the floaty outcome of this piece!
Lucie

Top: View B
Shorts: View B
My favorite part of this pattern:
I love how basic the top is. Without the ruffles and pocket it is so classic and versatile. The shorts are the perfect length. I love the pockets - they look amazing and I can easily stuff them with a lot of small things!
The whole outfit is very comfortable - it could be worn as pajamas, to a hike, but also to a date. I was wearing it to today when I was on a little hike with my dad. The weather was really hot today, but this two-piece romper saved me. It is so pleasantly flowy, I love that!
What I would do differently next time: This set fits me perfectly, so I wouldn't change anything about that. Maybe I would add the drawstrings, and I would try out the ruffle version. I would also try to make one top (maybe in a black linen) a little bit cropped to pair it with some high-waisted mom jeans. I want to make another set as pajamas, too - in a double gauze or some cotton waffle fabric.
Erin


Top: View A
Shorts: View A
My favorite part of this pattern:
I love how easy this pattern was to put together. This was a quick sew that resulted in two pieces I can either wear together or separate! I also love how when you tuck the shirt into the shorts, it looks like one cohesive romper, but with all the benefits of having a separate top and shorts.
What I changed about mine:
The shorts pattern states it is designed to be worn mid-rise, and I tend to prefer my shorts to sit more at my natural waistline (especially shorts with an elastic waist like these). Because of that, I added 3 inches to the rise of the shorts (between the crotch and the waistband).
I also wanted to make the waistline a bit more adjustable with a little more give, as I can be quite sensitive to tight elastic. Rather than constructing the elastic and drawstring to both go all the way around my waist as instructed, I shortened the elastic and cut the drawstring in half and connected each drawstring to either end of the elastic. The elastic then only ran from hip to hip along the back of the shorts, with the drawstring in the front still allowing me to tighten or loosen the shorts as I needed.
The last adjustment I made was actually NOT an adjustment. Because I chose to extend the rise of my shorts, I cut the shirt pattern as-is rather than doing the 3" adjustment that was suggested for my height.
What I would do differently next time:
Next time I make the shorts, I may actually add another 1-2" to the rise in addition to the 3" I already added to give just a bit more room in the booty to wear them where I want. Because I lengthened the rise of the shorts, I felt that it made the shorts look a bit long from top to bottom, so I will probably take about an inch or so off of the inseam.
Josephine


Top: View A
Shorts: View B
My experience with this pattern:
This is the first time I have made a top and pants, and the first time I have ever used a serger. I am 71 years old and learning to sew for the second time in my life. The first time was as a teenager, and I just did not have the patience to persevere! I found your instructions very well written, easy to follow and understand... Overall I found this an enjoyable learning experience. I am pleased with my efforts and look forward to wearing my new “duds”!
What I changed: I like the way the top fits across my chest, but I did have to take in the sides by 1” on each side. I took the liberty of lengthening the shorts to more of a capri length. Shorts don’t work for me at this stage in my life.
What I would do differently next time: The bottoms are bit snug. I probably should have chosen the next size up ( vanity got the best of me here).
Leah (👋that's me!)

Top: View A
Shorts: View A
My experience with this pattern:
I've sewn this set probably 30 times for customers of Charlie Darwin. There are some garments that people order where I honestly mildly dread having to sew it. This is NOT one of them! I feel excited because it is one of my easiest patterns to sew and I know for sure that it will be a great fit (I always get good feedback).
My personal samples of this garment are honestly getting quite the "patina" on them lol. It's my go-to outfit for adventuring, so my naturally dyed SALTWATER set is really shifting colors from sunscreen and sweat (ph shifts will do that to natural dyes!). In the making of this pattern, I was really pumped to carve out time for myself to make a fresh set in white!
What I would do differently if I was just making these for fun: I would experiment with making the shirt a crop top, and also experiment with making a long-sleeve version. I kind of want to try and make a long sleeve version where I actually keep the ruffle placement right above the elbow... or do like a double ruffle situation!
Cam (sewn by Leah)

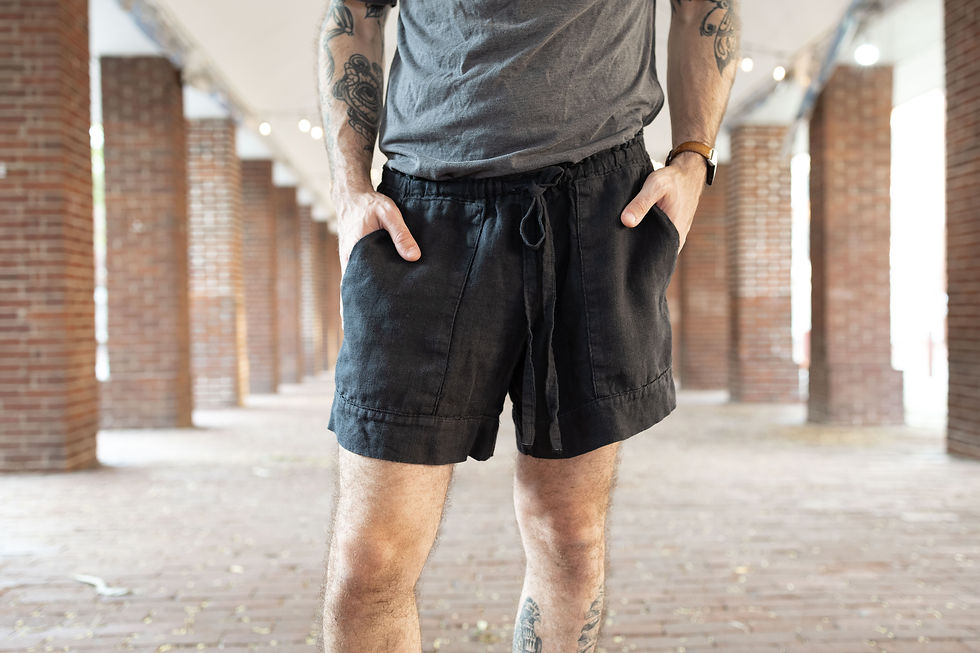
Shorts: View B
Sewn by me (Leah), and worn by my boyfriend Cam!
My experience with making the shorts pattern for a male body: Cam wanted (neeeeeeeded) a pair of shorts for summer because he had nothing good to wear for all our adventures. So I told him he should try on my pair of ruffled shorts just so we could think about a good inseam length. He put them on and said, "these are actually perfect. just make me these!"
And that is where the straight cuff hemline was born. I made him a pair in black and a pair with color-blocking. I feel super lucky to wear the same size pants as him so that we can share his pairs (although he already said to me "They aren't yours!!!")
I can say that he has worn them out on hikes and then gotten in bed with them still on... we both agree that dirty hiking clothes shouldn't be worn to bed, but take that as a testament that they truly are so cozy you forget you're wearing them!
My next step is to teach Cam how to sew his own linen shirt and shorts :)
Ready to sew your new favorite linen t-shirt and drawstring shorts?
Get the SALTWATER 2-piece bundle here (with a $4 savings)!
Or, dive in one piece at a time...
Not ready to buy yet? Consider saving this to your Pinterest board!

Follow along to get notified of SWALLOWTAIL pattern hacks and new sewing patterns as they're released!
Comments